![[Previous]](prev.gif)
![[Next]](next.gif)
![[Contents]](toc.gif)
![[Index]](index.gif)
This chapter describes how you can set up a SLIP or a PPP session
from your X station
so that you can:
- Work from home
- Work from a remote office
You can make two types of connections:
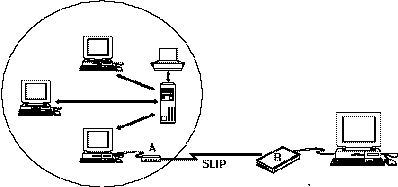
This section describes how to set up SLIP for
a back-to-back configuration
as illustrated below.
Location A represents
a networked office environment.
Location B represents a remote location such as a home office.
Note:
Before you take the remote X station to its intended location,
you may wish to set up the local and remote X stations side-by-side
to verify that the session works properly.
Perform the following steps:
If necessary, refer to the
Optimizing Performance or Troubleshooting sections for further information.
Gather all necessary equipment, including:
- 2 HP X stations (one with a ROM card adapter and a (minimum 4 MB)
flash ROM card.)
- 2 modems (or equivalent functionality through leased lines).
Modems must be high-speed and capable of supporting the following
modem standards:
- For data transmission:
- V.34 for 28,800 bps, or
- V.32 bis for 14,400 bps.
- For error control:
- For data compression:
- 2 serial cables
- 2 telephone lines.
Before you begin, make sure you:
- Identify one X station as local, the other as remote.
- Ensure that the remote
terminal has a flash ROM card adapter and a flash ROM card (minimum 4 MB)
installed.
Use the xflash utility to program the flash ROM card with an appropriate
ROM card image for the remote X station. For example, if the remote
X station is an ENVIZEX `p' series X station, program the flash ROM card with
the ENVIZEX 4MB standard package.
Set up the configuration parameters for the local X station
as described below.
Note that you can
set up some configuration parameters before you boot the X station, and others
only after the X station has downloaded its server file.
You should obtain
the appropriate IP address from your site system administrator.
- Parameter
- Local X Station Value
- IP
- (Local_X_station_IP)
- SLIP Subnet Mask
- 255.xxx.xxx.xxx
- Local IP
- The SLIP IP address of the local X station in
the form
192.x.x.x. (Note that this value
must be the same as the SLIP Remote IP for the other X station.)
- Remote IP
- The SLIP IP address of the remote X station in
the form
192.x.x.x. (Note that this value
must be the same as the SLIP Local IP for the other X station.)
- Subnet Mask
- 255.255.255.0
- CSLIP
- Enabled
- Serial Port
- 38400, 8, 1, None, RTS/CTS
(Set the baud rate according to your
modem type. Note that the baud rate must be set to the same value
on both X stations.)
- Serial Port Use For
- SLIP
- File Server
- hostname
- Alt File Server
- none
- Name Server
- IP address of host
- Alt Name Server
- none
- XDMCP Direct
- any host
- Boot from
- Network
- Fonts from
- Network
- rgb.txt from
- Network
- Terminal Name
- terminal name of local X station
- Domain Name
- your domain
- Time-out
- 10
- Alternate NFS/TFTP
- disabled
- Gateway/Route
- any
Set up the configuration parameters for the remote X station
as described below:
- Parameter
- Remote X Station Value
- IP
- (Remote_X_station_IP)
- SLIP Subnet Mask
- 255.xxx.xxx.xxx
- Local IP
- The SLIP IP address of the remote X station in
the form
192.x.x.x. (Note that this value
must be the same as the SLIP Remote IP for the other X station.)
- Remote IP
- Set the SLIP IP address of the remote X station in
the form
192.x.x.x. (Note that this value
must be the same as the SLIP Local IP for the other X station.)
- Subnet Mask
- 255.255.255.0
- CSLIP
- Enabled
- Serial Port
- 38400, 8, 1, None, RTS/CTS
(Set the baud rate according to your
modem type. Note that the baud rate must be set to the same value on
both X stations.)
- Serial Port Use For
- Serial Session
- File Server
- hostname
- Alt File Server
- none
- Name Server
- IP address of host
- Alt Name Server
- none
- XDMCP Direct
- same as File Server
- Boot from
- ROM
- Fonts from
- ROM
- rgb.txt from
- ROM
- Terminal Name
- terminal name of remote X station
(If you specify a Terminal Name, you must also specify both
a Name Server and a Domain Name.)
- Domain Name
- your domain
- Time-out
- 10
- Alternate NFS/TFTP
- disabled
- Gateway/Route
- (IP of local X station)/0.0.0.0
Make sure the modems are configured correctly:
- If you are using a high-speed Hayes-compatible modem, the Escape Command
Mode (register 2) will usually be disabled (
s2=255). If you leave
Escape Command Mode enabled, your SLIP session will be interrupted
as soon
as the modem detects an escape sequence
(+++)
anywhere in
the serial data stream.
- Set your modem's pacing to:
RTS/CTS (consult your modem's documentation
for instructions.)
If the X stations are not already booted, boot the local X station from
the network, and the remote X station from the ROM card.
Set up the routing information.
The following example shows how you could do this for
an HP-UX 9.x system.
- Log in as superuser and edit the
/etc/gated.conf
file to add an entry. For example:
 interface all passive
 static {
         <remote terminal name or ip> gateway <local terminal ip>
        };
- Add this entry to the file server, name server, and login (e.g., XDMCP) host
if they are different.
Note: Any server that will be accessed by the remote X station must have
this file updated with the above entry.
- Restart the existing
gated process. For example:
ps -ef | grep gated
kill <pid>
/etc/gated
- Check that the routing information is correct by typing:
netstat -nr
You should see a route to the remote X station through the local X station
(with
the local X station acting as a gateway).
Connect the modems as follows:
- Connect the serial cable from one of the X station's serial ports to the
modem.
- Connect the telephone line to the modem.
- Ensure the modem is plugged in.
 Test the modem connection as follows:
- From the remote terminal, press
[F12] to access the configuration screens.
- From the
[Serial Session] screen, type: at (response should be OK).
- Type:
atdt <phone number of local modem>
- When you see a
CONNECTED response on the remote X station's
serial session
screen, click on [SLIP]
and then on [To X Server].
- When a login screen appears (approximately 35-45 seconds), log in as usual.
When you are using SLIP with your remote X station,
you will notice significant
performance improvements if you use:
- Local window managers (such as mwm or ENWARE VUE/RX)
- Local terminal emulators (such as hpxt.hpterm or hpxt.xterm)
- Local applications (for example hpxt.xclock instead of the host-based
xclock).
If the two X stations cannot communicate, try the following diagnostic
steps:
- Check that the cables to both modems are securely attached.
- Check that you can
ping both X stations.
- Check the log screens on both X stations for errors or warning messages.
- Check routing information carefully (see suggested configuration above).
- Check that the serial sessions work before enabling SLIP on the
remote X station. To check the serial sessions, place both X stations in
serial sessions
and type in text from one. The text should appear on the opposite serial
session screen.
- Check the serial port parameters for both X stations.
- Check the SLIP parameters.
This section describes how to set up a SLIP or PPP connection between a
host computer and an X station.
Perform the following steps:
Note: These instructions apply to both SLIP and PPP, except where noted.
Make sure you review the following requirements:
- Use an HP 24542M cable to connect either serial port 1
(or serial port 2) to a modem.
- We have tested SLIP and PPP using V.32bis and V.42bis modems under compression
at the 38.4 kbps interface data rate.
For best performance, choose a modem that supports CCITT V.42.
In order for your host to run SLIP with an HP X station, the host must be
capable of supporting at least SLIP. Check with your host's documentation to
be sure. The following sections describe typical X station-to-host
SLIP configurations
using common SLIP packages available to each host.
To establish a PPP connection between a host and an X station, the host must
support PPP.
On many systems, Morning Star PPP is available.
The example in this section uses Morning Star PPP and
either of the following authentication protocols:
Connect the serial port, keeping in mind the following tips:
- If you are wiring the serial connector for a direct connection
to the host, you need to include modem signals
for signal assurance.
- Wiring pin 1 (DCD) provides signal
assurance from the host (or modem)
- Wiring pin 4 (DTR) provides signal assurance from the X station.
- Including modem controls assures correct disconnect and cleanup
of X server windows and clients over SLIP.
Note: Set the modem so that DTR is in normal mode. Do not set DTR to ON.
The hang up modem command does not work if DTR is ignored.
When you have completed connecting the serial port, refer to Step 3: Setting Up SLIP
or Step 3: Setting Up PPP as appropriate.
Note: For setup instructions for PPP, refer to Step 3: Setting Up PPP.
You can configure SLIP for HP-UX, Sun, SCO and IBM systems.
Refer to the appropriate section for details.
To set up SLIP on the host computer and the X station,
you need to complete the following tasks:
- Edit the
ppl.users to map each user name to a single X station
serial-line IP address. This allows the dial-in user to invoke
PPL without specifying the X station's serial-line IP address.
- Edit the
ppl.remotes to add the parameters to allow PPL
to set up a connection.
- Configure the hosts.
Note:
HP-UX 9.x does not support CSLIP. For more information on setting up SLIP,
refer to the HP AdvanceNet Using Serial Line Protocols.
- To edit the
ppl.users file:
- Edit one of the following:
- For HP-UX 9.x,
/usr/lib/ppl/ppl.users
- For HP-UX 10.x,
/etc/ppl/ppl.users
- Add the login of the user and the identifier for the X station's
local SLIP address
using the following format:
<username> <hostname>
For example:
smith   192.81.1.2
jones   jones700rx
The hostname can be either the X station's serial-line IP address
or the X station's serial-line nodename, provided that the nodename is
listed in /etc/hosts
or the NIS database, or it is resolved using a domain name server.)
- Save and quit the file.
- To edit the
ppl.remotes file:
- Edit one of the following:
- For HP-UX 9.x,
/usr/lib/ppl/ppl.remotes
- For HP-UX 10.x,
/etc/ppl/ppl.remotes
- Provide the information for all six fields shown in the following sample
ppl.remotes file which has been edited for use with an X station:
192.81.1.2  # remote host name or Internet address (HP X station)
192.81.1.1  # local host name or Internet address (HP-UX host)
                 # Internet mask
SLIP        # protocol [SLIP] [ASLIPC] [ASLIPS] [PPP]
DIALIN      # type [DIRECT] [DIALIN] [DIALOUT] [DIALIN & DIALOUT]
                 # UUCP system name
NONE        # line parity [EVEN] [ODD] [NONE]
                 # line speed
                 # serial line
                 # phone number
YES          # modem control available [YES] [NO]
                 # login info
                 # command name
Note:
- The
remote host name or Internet address is the
X station's serial-line Local IP address.
The local host name or Internet address is
the host computer serial-line IP address (named on the X station as the
serial-line Remote IP Address).
- You cannot leave the remote host name field blank. The X station cannot use
an Internet address assigned by
ppl from the ppl.ipool file.
- If you have configured the host computer so that it always runs PPL and
the X station is connected directly through the serial port, then set
modem control available to NO and set the serial line.
- To configure the hosts:
- Verify that the serial-line
subnet is automatically added to the routing table of that host by typing:
- For HP-UX 9.x systems:
/usr/bin/netstat -r
- For HP-UX 10.x systems:
/usr/sbin/netstat -r
- To display clients from other hosts, these hosts need to know how to
reach the serial-line subnet through the host running the
ppl
session. To provide this information to each host, you can either set up
a static route
or run gated, as described below:
- To add a static route to each host, edit their
/etc/netlinkrc files
as follows. Add:
/etc/route add net network ppl_host 1
or
/etc/route add net Xstation ppl_host 1
- To propagate routing information dynamically, run the
gated
daemon on each host by uncommenting the gated lines in their
/etc/netbsdsrc files.
Note:
To add a static route or propagate routing information on HP-UX 10.x systems,
edit the /etc/rc.config/netconf file.
- When you complete setting up SLIP on an HP-UX system, refer to Step 4: Configuring a SLIP or PPP Session.
To set up SLIP to work with the X station, you need to edit
the /etc/hosts.slip file.
(This is required for SLIP only, not for CSLIP.)
When sliplogin runs, it finds the X station's serial-line IP address
associated with the user's login and the connection parameters
in the /etc/hosts.slip file.
Note:
The instructions in this section assume that SLIP or CSLIP has
been installed and enabled on the host system.
SLIP and CSLIP packages are in the public domain and are available
from many ftp sites. At the time this manual was published, two
addresses were:
SLIP: ai.toronto.edu (128.100.1.104): pub/slip-4.0.tar.Z
CSLIP: ftp.uu.net:networking/ip/slip/cslip/cslipbeta.tar.Z
To edit the /etc/hosts.slip file on the host computer:
- Edit the
/etc/hosts.slip file to set up
your X stations.
- Fill in the necessary information in the following format:
<username> normal <hostname> <X_station_name> <subnet mask>
where username is the login of the user, hostname is the
host computer, X_station_name is the
X station. The subnet mask is optional. For example:
smith   normal   192.81.1.1   192.81.1.2   255.255.255.240
jones   normal   sunslc      jones700rx
Note: The hostname and X-station-name can be either the
serial-line IP address
or the serial-line terminal name, provided that the terminal name is
listed in /etc/hosts or the Yellow Pages database, or it is
resolved using a domain name server.)
- Now that you have complete setting up SLIP on your Sun system,
refer to Step 4: Configuring a SLIP or PPP Session.
To use SLIP on SCO systems, complete the following:
Note: The instructions in this section assume that SLIP/CSLIP has
been installed and enabled on the host system.
- Verify that your host computer:
- Has a
/dev/slip file.
- Has its serial port set correctly (
mkdev serial)
- Allows 8-bit characters on the serial device that you use for SLIP.
- When you have confirmed the above information, refer to Step 4: Configuring a SLIP or PPP Session.
To set up SLIP on an IBM system, you need to configure:
- the serial port driver.
- the serial port IP address into the system files.
- the RS/6000's serial port interface.
- To configure the
tty for serial port 1 to get the
best performance from your X station, follow these steps:
- As superuser, type:
smit
- Choose:
Devices
- Choose:
TTY
- Choose:
Change / Show Characteristics of a TTY
- Select:
tty0 Available 00-00-S1-00
- Select:
Enable LOGIN and set to disable
- Set the
BAUD rate to a value appropriate for your system.
- If you have a direct connection, try
38400.
- If you have a modem, choose an appropriate value.
- Select:
XON-XOFF handshaking and set to no
- Click on
[Do].
- To configure the RS/6000 to know about the X station's serial line
IP address:
- As superuser, run
smit.
- Choose:
Communications Applications and Services.
- Choose:
TCP/IP.
- Choose:
Further Configuration.
- Choose:
Name Resolution.
- Choose:
Hosts Table (/etc/hosts).
- Choose:
Add a Host.
- Fill in the
INTERNET ADDRESS and HOST NAME fields. (See the note
that follows.)
- Click on
[Do].
Note:
If your X station gets its X server code from a network, you
need to set up the X station's routing table so that the X station can
communicate both over the LAN and over the serial line. Setting up the
routing table is easiest if the LAN and the serial line are on different
networks.
- To configure the RS/6000's serial port interface:
- As superuser, run
smit.
- Choose:
Communications Applications and Services
- Choose:
TCP/IP
- Choose:
Further Configuration
- Choose:
Network Interfaces
- Choose:
Network Interface Selection
- Choose:
Add a Network Interface
- Choose:
Add a Serial Line INTERNET Network Interface
- Select:
tty0
- Fill in:
INTERNET ADDRESS
DESTINATION
Network MASK fields.
- Set the following:
ACTIVATE the Interface after Creating it? should be set to Yes
TTY PORT for SLIP Network Interface should be set to tty0.
- If you use a modem, fill in the
BAUD RATE and DIAL STRING
fields. Otherwise, leave both blank.
- Click on
[Do].
- Refer to Step 4: Configuring a SLIP or PPP Session.
Note: For setup instructions for SLIP, refer to Step 3: Setting Up SLIP.
You can set up your PPP session for HP-UX, Sun, SCO and IBM systems.
Refer to the appropriate section for details.
To set up PPP on your HP-UX system, you need to complete the following tasks:
Note:
In this example, we assume that you are using
the Morning Star PPP package and
that it has been correctly installed.
- Determine which serial ports on the host are going to be used for answering
incoming calls.
- Connect your modem to this serial port.
- Log into your host as root.
- At the prompt, type:
sam.
- When
sam starts, complete the following:
- Select
[Peripheral Devices].
- Select
[Terminals and Modems].
- Under the
[Actions] menu, select [Add Modem].
- Select the options you want for this serial port. In this example, the host
will be receiving incoming PPP calls, so enable the
Receive Incoming Calls
option. Be sure to set the baud rate to a speed that matches your modem.
Note: When selecting baud rates greater than 19200bps, it is important that
you turn on hardware flow control.
If you do not, there may be packet losses and
errors in transmission over the serial device.
On the host side, you can access the
serial devices in the /dev directory. Typically, a serial device will be
named something similar to /dev/ttyd0p1 for a serial port connected to a
modem. In an HP-UX environment, the hardware flow-control
can only be turned on by
creating a new device file under /dev using the mknod command.
- When you have finished selecting the options, click on the
[OK] button.
sam creates the appropriate device files under /dev
for your serial port.
Note: If your version of getty will not automatically answer
incoming calls,
you will have to configure the appropriate modem DIP switch
to automatically answer incoming
calls. Consult your HP-UX and modem documentation for details.
Your HP-UX system is now configured to accept incoming calls. Ensure that
your modem is connected to the phone lines. You can call this modem now (from a
terminal emulator or PC) and get a login prompt to your workstation. Refer to
Step 4: Configuring a SLIP or PPP Session.
- To set up PPP, refer to your system-specific PPP documentation.
- When you are finished, refer to Step 4: Configuring a SLIP or PPP Session.
To configure a SLIP or PPP session from the X station,
you will need to complete
the following steps:
- Load the X server from the LAN or from
a ROM-based server card.
- Press and hold
[F12] to access the configuration screens.
- Click on
[Network].
- Click on
[SLIP] or [PPP], as appropriate.
- Enter the serial line network information.
Note: The instructions below assume that you want to communicate with
the host on the other side of the serial line.
If you are connecting to other hosts, see
Connecting to Other Hosts through the Serial Line.
- For
Local IP, type in the X station's serial-line IP address.
- For
Remote IP, type in the host computer serial-line IP address.
- For
Subnet Mask, type in the serial-line subnet mask. You can leave
this field blank; the X station can calculate it.
- (For SLIP only) When you use SLIP, the X station server
automatically responds with CSLIP
when it receives CSLIP. To initiate CSLIP, enable
Compression now.
- (For PPP only) If applicable, provide the
Username: and Password:
for PPP Authentication. Note that the password cannot be
more than 15 characters.
- Click on
[OK].
- Click on
[Terminal] to go to the Terminal configuration screen.
- Set the serial port parameters so that it works with the modem or with the
serial-line direct connection:
- Select your modem speed.
- Select
8 for data bits.
- Select
None for parity.
- For flow control, choose
None if XON/XOFF is set, otherwise
the configured setting will be used.
- Set the serial port use to
[Serial Session] so you can
type to the serial port; for example, to dial out.
- Click on
[Utilities], then on [Serial Session].
- Click on
[Options] to configure the local echo, auto wrap, new line,
character set, and
configurable-key operations to work with the host computer.
- Click on
[OK].
- Refer to Step 5: Connecting to the SLIP or PPP Host Computer.
To run clients on other hosts you need to configure both the
Setup menu (for SLIP or PPP) and the routing table.
You may also need to configure routing information on the hosts.
To illustrate how to configure an X station to use a serial-line gateway,
consider a person whose office has two
workstations and whose home has an X station:
- The office has two workstations, IP addresses 192.81.1.1 and
192.81.1.5, connected by a LAN.
The latter workstation has a modem connected to its serial port,
whose SLIP IP address is 192.81.2.20.
- The home X station, SLIP local IP address 192.81.2.23,
has a modem connected to its serial port.
The serial line network, which consists of the X station and
the serial-line side of one workstation, is on a
subnet that comprises IP addresses from 192.81.2.1 to 192.81.2.254.
The LAN network, which consists of the two workstations, is on a
subnet that comprises IP addresses from 192.81.1.1 to 192.81.1.254.
The subnet mask for these networks is 255.255.255.0, which indicates
these Class C networks can have 254 hosts (256 minus the two reserved
numbers,
x.x.x.255, which is the broadcast address, and x.x.x.0, which is not used
for hosts).
To configure the X station to operate in the above environment,
the X station's Setup SLIP menu or Setup PPP menu requires
the following entries:
-
Local IP Address -
192.81.2.23
-
Remote IP Address -
192.81.2.20
This must be the IP address of the remote device on
the serial line (the gateway).
-
Subnet Mask -
255.255.255.0
Note:
You must use different IP addresses for SLIP and PPP.
The Gateway Table entries
indicate that the gateway leads to the rest of the network
(in this case, the workstation):
-
Gateway -
Route to
-
192.81.2.20 -
0.0.0.0
When you have completed these entries, refer to Step 5: Connecting to the SLIP or PPP Host Computer for details.
You can use SLIP or PPP on a direct line to the host computer,
or through a modem.
To start a serial session:
- Press
[F12] to access the configuration screens.
- Click on
[Utilities].
- Click on
[SLIP] or [PPP].
- Click on
[Serial Session].
- If
[Serial Session] is not enabled, click on it now.
When the Serial Session screen
appears and [Serial Session] is enabled, the characters you
type are sent to the serial port.
Typically you would use this to dial a modem and start a SLIP session.
- If necessary, refer to Establishing a Connection through a Modem.
- When you are finished, refer to Step 6: Starting SLIP on the Host or Step 6: Starting PPP on the Host,
as appropriate.
Use the Serial Session screen to dial and
log into the host computer. If you have a modem, type a dial-out
command as described in the documentation that came with your modem.
Typically, this is similar to:
ATDT 555-1234
If you have a dial-back configuration, log in normally (giving
vt100 as your terminal type) and indicate your X station as
the dial-back machine.
Hang up, and wait for the callback.
Note: For startup instructions for PPP, refer to Step 6: Starting PPP on the Host.
How you start SLIP on the host depends on which type of host you have:
- Log in normally.
If prompted for your terminal type, give
vt100 as your response.
- Once you have logged in, to start SLIP on the host, type:
ppl
If you have not set up ppl.users on the host computer,
type ppl and the X station's serial-line IP address. For example:
ppl 192.81.1.3
- Click on
[SLIP].
- Click on
[To X Server].
- Once you have started SLIP on the host, refer to Step 7: Starting Your X Session.
- Log in normally. If prompted for your terminal type,
give
vt100 as your response.
- Once you have logged in, start SLIP on the host:
- If you are using SLIP, type
sliplogin
- If you have enabled CSLIP on the
[SLIP Network] configuration screen
and your connection is on /dev/ttya,
(for Solaris 2.x, /devices/ptm/tty), type:
slattach ttya host_ip_address X_station_address
- Click on
[SLIP] to activate it.
- Click on
[To X Server].
- Once you have started SLIP on the host, refer to Step 7: Starting Your X Session.
- Log in as root.
- If prompted for your terminal type,
give
vt100 as your response.
- Once you have logged in as root, start SLIP on the host.
You must be logged in as root for
slattach to work.
If your connection is on /dev/tty1a, type:
slattach /dev/tty1a host_ip_address X_station_SLIP_address
baud_rate
where tty1a is com1 and tty2a is com2. The baud_rate is
optional.
- Click on
[SLIP] to activate it.
- Once you have started SLIP on the host, refer to Step 7: Starting Your X Session.
- Log in normally. If prompted for your terminal type,
give
vt100 as your response.
- Click on
[SLIP] to activate it.
- Click on
[To X Server].
- Once you have started SLIP on the host, refer to Step 7: Starting Your X Session.
Note: For startup instructions for SLIP, refer to Step 6: Starting SLIP on the Host.
How you start PPP on the host depends on which type of host you have:
Note: This section assumes you have used the Morning Star PPP setup.
- When you call your host from your X station, log into your host as you
normally would when you get the login prompt.
- Now you can initiate PPP on the host by directly invoking
the Morning Star PPP daemon:
/usr/etc/pppd host_IP terminal_IP idle 300 netmask netmask value
Note: A typical setup in which a host answers incoming calls for
PPP connections
usually involves creating a separate login account for the PPP user.
When the
user logs into this special account, the PPP daemon starts automatically.
For details,
refer to your Morning Star PPP documentation.
- Once you have started PPP on the host, refer to Step 7: Starting Your X Session.
- Refer to your system-specific PPP documentation for details.
- Once you have started PPP on the host, refer to Step 7: Starting Your X Session.
You can use
XDM, dtlogin, vuelogin (HP-UX), scologin (SCO UNIX), or TELNET
to start your serial-line
X session, just as you can for an Ethernet-based X session.
However, an Ethernet user can have a startup script that uses
many resources (multiple terminal emulators, mwm, and
numerous X clients).
Rather than attempt to start such a time-consuming X session over a serial
line, users may prefer to disable XDMCP and to
use TELNET for a serial-line X session.
By using TELNET, the user can either start clients individually
or create a startup script that runs a limited number of clients.
For more information:
To use TELNET to begin a serial line X session, do the following:
- Press and hold
[F12] to access the configuration screens.
- Disable XDMCP by following these steps:
- Click on
[Server] to access the Server configuration screen.
- Click beside the
[Login] button.
- Drag the cursor to set the field to
[None].
- Click on
[OK].
- Click on
[OK] again.
- Click on
[Utilities].
- Click on
[Telnet Session].
- Type in the IP address of the TELNET host.
(This must be the SLIP or PPP
Remote IP Address unless you have the
appropriate entries in the routing table (see Connecting to Other Hosts through the Serial Line).
- If you want to use 8-bit characters with TELNET,
click on the TELNET
[Character Set] button until the 8-bit character set
of your choice (ISO Latin-1 or HP Roman-8) appears.
- Click on
[Execute TELNET].
- Log in normally. If asked for your terminal type, respond:
vt100
- Before you can access clients, you must
use one of the following command lines
to set the DISPLAY environment for your X station
(substitute the serial line
IP address or hostname of your X station in place of 192.81.1.3)
- If you use Korn or Bourne shell:
DISPLAY=192.81.1.3:0.0 ; export DISPLAY
- If you use C shell:
setenv DISPLAY 192.81.1.3:0.0
- Start your clients.
- Click on
[To X Server].
To end the SLIP or PPP session, follow these steps:
- Terminate your serial port's clients.
Note that if you choose to reset the X station,
you terminate both the clients on the serial connection and
those on the LAN (if any).
- Terminate the serial session on the host.
- Go to the Serial Session screen and click on
[Disconnect] and [OK].
If you are using a modem, this hangs up the modem and
terminates the serial session on the host.
If you have a direct connection to the host that uses the modem control
lines, this terminates the serial session on the host.
Note: If you are using PPP, make sure you return to serial line mode.