![[Previous]](prev.gif)
![[Next]](next.gif)
![[Contents]](toc.gif)
![[Index]](index.gif)
Before you begin configuring your X stations, you may want to review the section Local versus Remote Configuration for a brief overview on configuring X stations remotely or locally. For more information, see Configuration Options.
Optional customization topics in this chapter include the following:
You can configure your HP X stations remotely (from the host) or locally (from each X station's configuration screens).
For most customers, the best way to make users productive quickly is to configure the X stations from the host using either BOOTP or DHCP, and remote configuration. For details, see Using Remote Configuration.
However, other customers find that the flexibility to change configuration values from the X station's configuration screens is an important feature. For details, see Using the Configuration Screens.
The remote configuration file is created automatically when you
install X stations (as described in Adding HP X Stations to Your Network).
The remote configuration file
(basepath/config/sample.cfg)
is copied to terminalname.cfg
for each X station you install. If you need to customize the
remote configuration file,
you should do so before the master file gets copied for each X station.
For specific values and syntax of remote configuration parameters, refer to Remote Configuration Parameter Reference.
.cfg file
overwrite the X station's configuration at every power on.
If you change the X station's configuration from the configuration screens,
you may need to disable Remote Configuration. To do so:
[F12] to access the configuration screens.
[Network].
[General].
Network Parameters field to: From Fields Below
[Terminal] configuration screen.
Remote Config field to disable the download.
[OK].
By default, remote configuration is re-enabled by BOOTP or DHCP each time you power up the X station.
$(variablename).
Variables can include other variables--the server expands each variable
until it derives a unique parameter.
Alternative values for variables are specified as comma-separated lists.
The X server supports the following variables:
$(BasePath)/usr/lib/X11/700X.
For HP-UX 10.x systems, this path
is: /opt/hpxt/enware/xthome.
$(FileServerList)/nfs/fileserver1,/tftp/fileserver2
$(SearchPath)$(SearchPath) to
$(BasePath), $(FileServerList)$(BasePath) could cause it to expand to
/usr/lib/X11/700X and /nfs/fileserver/usr/lib/X11/700X.
$(LANG)$(TerminalName)Terminal Name parameter.
$(NodeNameList)$(Personality)$(NodeNameList) variable
followed by a period and by nothing: $(NodeNameList).,, In the case of
$(Personality)snmpdrc for an X terminal that has an IP address of
125.4.5.6 and a terminal name of xterm1, this expands to
xterm1.snmpdrc, 125.4.5.6.snmpdrc, and snmpdrc
$(RGBClass)rgb.txt file
that has been
customized to work with 98xxx or A10xx monitors. The X server
determines the correct value automatically.
[F12] or equivalent key on your keyboard.
[Preferences], [Terminal], [Server], [Network], [Diagnostics]
or [Utilities]
[Setup] icon, or
[To Config], or
If your monitor does not synchronize to the desired resolution, refer to the following sections.
[Alt] (or [Extend Char]) key.
[Alt][2][7][4][5] for a monitor type of
C2745A).
[Alt] (or [Extend Char]) key.
[To Config] or the Setup icon.
[Terminal].
[Monitor] button to view the list of
supported monitors and resolutions.
[OK].
[Alt] (or [Extend Char]) key.
0
[Alt] (or [Extend Char]) key.
[Alt][1]
[Alt][2]
[Alt][3]
If you have an Energy Star monitor, your X station sets your monitor to run in "suspend" mode when the screen saver timeout occurs. Suspend mode reduces the monitor's energy consumption. To exit suspend mode, simply move the mouse or press a keyboard key.
If the X station stays in suspend mode for more than an hour, the X station sets the monitor into "off" mode, in which the monitor uses the least amount of power. To leave "off" mode, again you simply move the mouse or press a keyboard key.
Depending upon the length of time the monitor has been in suspend mode, it may take a few seconds to warm up again.
The default keyboard is USASCII PC 101/102. If you have a different PS/2 keyboard, you have to set up the keyboard language either by modifying the X station's remote configuration file (see Modifying the Remote Configuration File), or by using the configuration screens as follows:
[F12] to access
the configuration screens.
[Terminal] screen.
[Configure] button to the right of the
current keyboard window.
[OK] to exit the popup window.
[OK] to exit the configuration screens.
[Reset] to make your change take effect.
The X station uses the subnet mask, its own IP address, and the destination IP address to determine whether the computers you want to access are on the local subnet or past a gateway.
If your X station has to go through gateways or routers to access computers, you need to set up the X station's gateway table.
For details, refer to the following sections:
The X station looks at its gateway table to find which gateway to use to reach a particular network or host. Each line of the gateway table has a "Gateway" entry and a corresponding "Route to" entry.
You can access the X station's gateway table through the
[General Network] configuration screen.
For more information about setting the gateway table entries and networking in general, refer to:
25.6.6.1, the network ID is
25.0.0.0.
205.130.22.9, the subnetwork ID is 205.130.22.0.
For example, before attempting to establish a communication link
to a destination
computer (for example, a file server), the X station logically ANDs the
entry in the Subnet Mask field with the IP address of the X station and
the IP address of the file server. If the resulting numbers differ, this
indicates that the X station is on a different subnet than the file server.
The X station will then use the entries in the routing table to establish
communications.
The subnet masks for the various classes of IP addresses are as follows:
If the destination is not on the X station's own subnet, the X station uses its gateway table to determine if there is a match, for example:
If the X station is unable to route through a specified
gateway, it attempts to route through the "default"
gateway. Designate the default gateway with a Route to
of "0.0.0.0". Set only one Route to entry to "0.0.0.0", otherwise
one of the entries (the second) will not be used.
Route to entries must not specify two paths to the same network.
If you have two gateways
that can connect an X station to a computer, only one can
be given the default Route to entry (0.0.0.0).
With the X server, you can use proxy ARP (Address Resolution Protocol) to route data to an otherwise unspecified subnet.
By using proxy ARP, you do not need to configure the X station to have a specified default gateway on the network. Instead, the X station relies on other devices on the network (such as routers and gateways) to have the routing information the X station needs. When the X station determines that it has data to send to a destination outside the local subnet and not serviced by any of the configured "Route to" entries, it broadcasts an ARP. The router that can transfer the packet to the correct subnet responds, giving the X station an initial destination for its data. The X station then sends its data to the router that can move the data towards its final destination.
To set the X station to use Proxy ARP, configure the gateway table so that the X station's address is the address of the default gateway:
0.0.0.0
You can use downloadable extensions to add additional capabilities to the X station when it boots up. There are two types of extensions:
You can configure an X station to download an X server with extensions at the next reboot as follows:
[F12] to access the configuration screens.
[Server].
[Extensions...].
Load
appears under Next Reboot, click [OK],
then click [OK] again.
Once loaded in, the downloadable extensions remain until you disable them and reboot the X station.
The ENWARE X station software includes the following base extensions:
and the following X server extensions:
noshow parameter is specified for an extension in
the modules.ld file, that extension will not appear in the Extensions list.
modules.ld file.
You can edit the modules.ld file to do the following:
autoload) an extension when each X station is booted.
noshow).
The modules.ld file can be found in basepath/bin/modules.ld.
Within the file, you will find a description of each extension
and instructions for how to edit the file.
For example, to download the SXext (SharedX) extension automatically, include the autoload parameter as follows:
 # DOWNLOADABLE X EXTENSIONS
 # SharedX requires that your HP-UX has SharedX installed and running
 SXext  "Ext xext autoload"  SharedX  "Shared X Extension"
Each X station can generate a variety of status and error messages. All of these messages are written to a log. You can also:
The following sections contain additional information:
Each message is tagged internally with a syslog message class. Although this class is not displayed to you directly, it has the following effects:
<ERROR> messages are displayed in bold text.
The following syslog message classes are defined:
<EMERGENCY><ALERT><CRITICAL><ERROR><WARNING><NOTICE><INFO><DEBUG><CLIENTERR><CLIENT>For a list of ENWARE messages, see Messages.
[F12] to access the configuration screens.
[Diagnostics], then on [Log Screen].
[Report] button to choose which message classes to display:
<ERROR> or higher
<WARNING> or higher
/config/terminalname.cfg)
Report variable to one of the following values:
<ERROR> or higher
<WARNING> or higher
[F12] to access the configuration screens.
[Terminal].
Remote Config option, select [Download].
If you want to send log messages to one or more hosts, set the values of two remote configuration parameters:
syslog Class Mask determines which message classes are sent
syslog Host List determines which host or hosts the messages are sent to
Follow these steps:
/config/terminalname.cfg)
syslog Class Mask variable.
syslog Class Mask = <ALERT>,<ERROR>,<WARNING>
syslog Host List.
syslog Host List = hosta, 10.4.1.21
Each name or address is optionally followed by a colon (:) and a syslog facility name, optionally followed by a colon (:) and a port number. The default facility name is logLocal0.
Examples:
syslog Host List = hosta:logLpr:2000
syslog Host List = hosta:logLocal7
syslog Host List = hosta::2000
[F12] to access the configuration screens.
[Terminal].
Remote Config option, select [Download].
  syslog Class Mask = <ALERT>, <ERROR>
  syslog Host List  = 10.4.1.21
type the following commands on the command line:
remsh terminalname putlog "<ALERT> ALERT test"
remsh terminalname putlog "<ERROR> ERROR test"
(On Sun systems, use rsh instead of remsh.)
If syslog is working, these messages will appear in the syslog file that you configured on host 10.4.1.21.
smit.
If the file server for the X stations
is the same server you use to run the administration scripts
(xtadm), you can
modify the ENWARE version as follows:
Manage software versions from the main menu.
HP X STATION ADMINISTRATIVE TASKS
       VERSIONING MENU
*NOTE*: this host must be the file server for the X station(s)
   1) Show installed versions
   2) Change default version site-wide
   3) Show/Change active version for an X station
   4) Remove a version
       ?) Help                p) previous menu
Please enter selection (default=1)
3) Show/Change active version for an X station.
2)Change default version site-wide
At this time, you may wish to delete the previous version by selecting:
4) Remove a version.
In addition, if you want to use national language characters:
If you cannot generate the characters you need with your keyboard or if you want to change the layout of your keyboard, HP-UX users can use the ENWARE Keyboard Mapper to change the characters their keyboards produce.
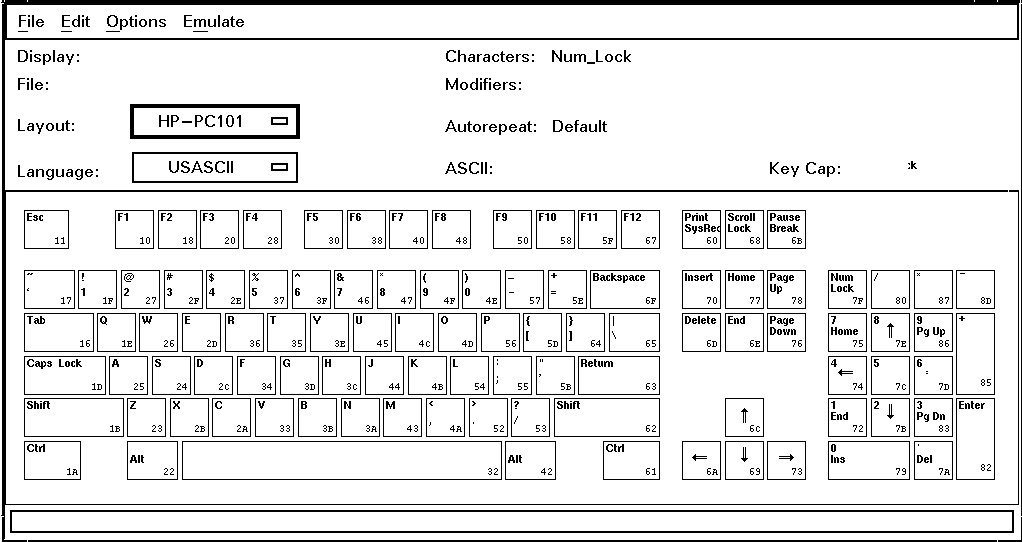
&ware; Keyboard Mapper
With the ENWARE Keyboard Mapper, you can:
[Terminal] configuration screen.
To start the Keyboard Mapper, type:
/usr/bin/X11/700X/xkeymap &
or, for HP-UX 10.x systems, type:
/opt/hpxt/enware/bin/xkeymap &
A display of a USASCII PC-101 keyboard appears.
To modify the keyboard of your X station:
[File].
[Read Keyboard].
:0.0
or the terminalname:0.0 of your X station.
[OK].
A display of your X station's keyboard appears.
To modify a keyboard that is not associated with a particular X station:
[File].
[New].
There are two ways to change the operation of your keyboard. If there are relatively few changes you wish to make, you can edit the current keyboard's keys directly. If there are many changes you wish to make, you probably want to make your keyboard emulate a particular type of keyboard. In this case, you can display the desired keyboard and copy its keys to your current keyboard.
To edit a key directly:
If there is a particular kind of keyboard you want to emulate:
[Options].
[Emulate Keyboard].
[OK] to display that keyboard.
The displayed key cap does not change, but its functions (shown beside the word "Characters:") update.
You can apply the changes immediately or not until you switch the X station off and on:
[File], then [Write Keyboard].
[OK].
The changes stay in effect until you power the X station off and on.
[File], then [Save].
.kbd in the
Selection field.
[OK].
/config/terminalname.cfg) as follows:
Xkeymap File = $HOME/terminalname.kbd
If you have remote configuration enabled, the X station applies the changes you made to its keyboard the next time you switch the X station off and on.
There are certain changes you might want to make if you have a PC 101/102 layout keyboard:
[Num Lock] on a PC 101/102 keyboard,
use the instructions in "To Edit A Key Directly" to
use the "Enable Modifiers" menu. Map "Mod5" to [Num Lock].
[F5]
[F7]
[F10]
[Compose] to [F11] (map the Multi_key character to [F11]).
In environments where you run clients on different types of hosts, you may want to have different keyboard functions available depending on which client you are using. This capability, called dynamic keyboard mapping, is the process of assigning a predefined keyboard map to a particular client. To use dynamic keyboard mapping:
$HOME/.xsession or $HOME/.vueprofile
file to start
your clients with customized keyboard maps the next time you log in.
$HOME/.xsession or $HOME/.vueprofile file.
For example, in the $HOME/.xsession file, after the line that reads:
### Add client commands below, one command per line.add lines similar to the following (replacing
terminalname with the name of
your X station and client1 and client2 with the name of the clients
you want to remap your keyboard for):
/usr/bin/X11/700X/hpxt.dkmserver -port 2 &
xmodmap -display terminalname:0.0 -pke > terminalname.kbd
xmodmap -display terminalname:2.0 - < terminalname.kbd
xmodmap -display terminalname:2.0 - < client1.kbd
client1 -display terminalname:2.0 &
xmodmap -display terminalname:2.0 - < terminalname.kbd
xmodmap -display terminalname:2.0 - < client2.kbd
client2 -display terminalname:2.0 &
These example lines do the following:
If you are primarily running HP clients and have a PS/2 keyboard, you can re-map your PS/2 keyboard to provide the missing functions required by some HP clients.
To re-map your PS/2 keyboard:
.xsession file:
xmodmap basepath/examples/hpemulation
.vueprofile file:
xmodmap basepath/examples/hpemulation
hpemulation line that maps [Delete Char] to [Delete] also
makes it impossible to use [Ctrl] [Alt] [Delete] to reset the
X station.
If this is unacceptable, you could use a line similar to the following
to permit the reset key-combination to work and
to map [Delete Char] to [Shift]+[Delete] and [Shift]+[Delete line]
to [Alt]+[Delete]:
keycode 109 = Delete DeleteChar DeleteLine
The HP-HIL keyboard emulation on a PS/2 keyboard provides the following key mappings:
[Stop][Scroll Lock]
[Reset/Break][Pause/Break]
[Delete Char][Delete]
[Shift]+[Delete line][Shift]+[Delete]
[Delete line][Alt]+[End]
[Insert Char][Insert]
[Shift]+[Insert line][Shift]+[Insert]
[Insert line][Alt]+[Home]
[Menu][Alt]+[Num Lock]
[Shift]+[Menu][Shift]+[Num Lock]
[User][Shift]+Numkpd [/]
[System][Alt]+Numkpd [/]
[Enter][Shift]+Numkpd [-]
[Select][Alt]+Numkpd [-]
[Clear line][Alt]+Numkpd [+]
[Shift]+[Clear line][Shift]+Numkpd [*]
[Clear display][Alt]+Numkpd [*]
[f1]...[f8][F1]...[F8]
[F9]...[F12]
[Enter][Enter]
[Extend Char][Alt]
[Tab]If you want to activate national language characters on your keyboard, you need to set the character type.
For applications to access the 8-bit Latin-1 character set (ISO 8859.1),
add the following lines to the
.cshrc file in your home directory:
setenv LC_CTYPE iso_8859_1
stty pass8
stty cs8 -istrip -parenb
setenv LANG C              # "C" or your "LOCALE"
setenv CTYPE iso_8859_1
stty cs8 -istrip -parenb
LANG=C                     # "C" or your "LOCALE"
CTYPE=iso_8859_1
export LANG CTYPE
You can now invoke an application using an 8-bit font, typically from the
iso_8859.1 font directory. For example:
cmdtool -ls -fn timR10 &
Before you start applications that access 8-bit character sets on SCO systems, type the following lines in the terminal emulator window where you plan to run the application:
LANG=english_us.8859
export LANG
stty cs8
Then, start the application, for example:
/usr/bin/X11/xterm -ls -fn courr10
.xsession, to .profile, or to
.cshrc in the
user's home directory, as long as the X client calls that file.
(With xterm,
the -ls option ensures that .profile or .cshrc is called.)
For information on using non-U.S. English keyboards, "dead" keys, and compose keys, refer to the appropriate SCO Open Desktop manual.