![[Previous]](prev.gif)
![[Next]](next.gif)
![[Contents]](toc.gif)
![[Index]](index.gif)
Local clients are applications that run directly on the X station rather than on the host. This chapter explains what kinds of local clients are available and how you can set up local clients on your HP X stations.
Topics include:
Provided that your X station has sufficient memory installed, you can use any of the following types of local clients:
For more information, refer to Using a Local Window Manager.
See Using a Local Window Manager for more details.
hpxt.*, which is known as a peer. A peer process seeks out specific
information in your $HOME directory about your X station,
and passes it along to the local client.
For instance, when used to start a local window manager, a peer process such as
hpxt.vuerx searches in your home directory
for any customized
window-manager resource file and provides this information
to the local window manager's
executable portion.
You can use local clients to save host memory effectively only if you are aware that host-based clients can share resources, as can local clients.
For example, terminal emulators have a "code" component, which is sharable, and a "data" component, which is unique to each invocation of the client. When you run a terminal emulator on the host, shared resources make it possible to start more copies of the terminal emulator while increasing the host memory usage by only the data component of the client. When running terminal emulators as local clients, the memory advantage of local terminal emulators is diminished if any user starts a host-based version of the terminal emulator. And because multiple copies of local terminal emulators can share resources, it is a good idea to standardize on one terminal emulator at your site.
If your system has sufficient memory on both the host and on the X stations, it is most memory-efficient to run clients on the host. For example, say that a particular terminal emulator requires 1000 KB for the first invocation, then 300 KB for each subsequent invocation whether running on the host or on an X station. If you have ten X station users, each of whom wants to have two terminal emulators, the total memory used would be as follows:
On the other hand, if your host is fully loaded with memory and performance is inadequate because there are too many demands on the system, it makes sense to offload clients to the X stations.
Many X terminal users choose local clients to reduce the network load. While this can be a benefit, the network load savings are not likely to be noticeable until you reach at least 25% of the LAN's capacity. In general, local window managers provide better network-traffic savings than local terminal emulators.
This section covers the following topics:
.xsession file (or the sys.xsession file)
.xsession file (or the sys.xsession file).
Change the file so that it starts the local window manager that you want.
Refer to
Local Window Managers and Their Peer Processes and the comments within the file as necessary.
Xconfig file.
The file has one of the following locations:
/usr/vue/config/Xconfig (for vuelogin)
/etc/dt/config/Xconfig (for dtlogin)
Within this file, the XDM mode is set globally, for example:
Vuelogin*xdmMode: True
You can override the global setting for a specific terminal
with a line like this:
Vuelogin.terminalname_0.xdmMode: False
Set XDM mode for your terminal to True (or, if the global XDM mode is True make sure that there is no False setting for your terminal).
If you want to run vuewm locally, do the following:
[OK].
To change back to running vuewm from the host,
repeat these instructions.
The prompt will be reversed:
"You are currently configured to execute VUEWM as a local client on your terminal.
Do you want to run VUEWM on your workstation instead?"
click on [OK].
/usr/bin/X11/700X/hpxt.vuerx
/usr/bin/X11/700X/hpxt.dtwmlite
/usr/bin/X11/700X/hpxt.mwm
/usr/bin/X11/700X/hpxt.twm
/usr/bin/X11/700Xhpxt.olwm
For HP-UX 10.x systems, the local window managers and their peer processes are:
/opt/hpxt/enware/bin/hpxt.vuerx
/opt/hpxt/enware/bin/hpxt.dtwmlite
/opt/hpxt/enware/bin/hpxt.mwm
/opt/hpxt/enware/bin/hpxt.twm
When you log on, your
.xsession file starts a peer process
that invokes the local window manager.
When the peer process starts the local window manager,
the window manager searches in the user's home directory for any
customized window-manager resource file (for example, $HOME/.twmrc,
$HOME/.mwmrc,
$HOME/.vuerxrc, or $HOME/.vue/vuewmrc).
If these files do not exist, the local window manager uses system default files on the host--the same system default files that the host-based version would use:
/usr/lib/X11/twm/system.twmrc
/usr/lib/X11/system.mwmrc
/vuerx/sys.vuerxrc
/usr/vue/config/sys.vuewmrc
For HP-UX 10.x systems, the path for sys.vuewmrc is:
/etc/vue/config/sys.vuewmrc.
modules.ld file (basepath/bin/modules.ld)
and any window manager listed there is available to
the user from the [Preferences] configuration screen.
If you configure the
X session manager to start without a window manager, you could
start a local window manager from the [Preferences] screen, but
this is not recommended.
When started this way, a window manager does not know your home
directory (because there is no peer present).
Consequently, the window manager would use the system default
colors and operation, which may not suit your requirements.
Local versions of
mwm and twm behave similarly to their host-based equivalents.
However, there are some parameter restrictions that apply to the
local versions. Refer to the appropriate man page for details (e.g.,
man hpxt.mwm or man hpxt.twm.)
For information on using local vuewm, consult your HP VUE documentation. You should see no difference in operation between running vuewm on the X station and running a VUE session completely on the host.
man hpxt.olwm).
ENWARE VUE/RX is a local window manager that has been specifically designed for HP X stations.
The default control panel contains:

&wwm; Control Panel
Two files define the control panel:
$HOME/.vuerxrc
$HOME/.vuerxrc file defines
the default control panel to have the functions listed above.
Controls for a screen lock and a
terminal launcher are commented out, but can be activated easily.
$HOME/.Xdefaults.
$HOME/.Xdefaults file defines the colors and fonts used. See the
man page for vuerx for resource descriptions.
For more information about this file, see Customizing Colors, Fonts and Other Application Defaults.
/vuerx/sys.vuerxrc to your $HOME/.vuerxrc file.
/lib/app-defaults/Vuerx to your $HOME/.Xdefaults file.
The remainder of this section describes modifications you can make to customize the ENWARE VUE/RX interface. Topics include:
man vuerx
For information on the ENWARE VUE/RX resource file, you can refer to its online man page by typing:
man vuerxrc
In general, clients started by an .xsession file appear in
workspace one and the clients you start manually appear in the workspace
in which you start them.
However, some clients are so useful that you may want them
to appear in more than one workspace.
To control the workspaces in which a client appears, click and hold on the square in the upper-left corner of the window (that is, the portion of the window's title bar that contains a long rectangle). You will see the following entries:
Occupy Workspace... provides a Workspace Presence menu.
To add the window to new workspaces:
[OK].
To remove the window from workspaces:
[OK].
Occupy All Workspaces is a quick way to add the window to all of your
workspaces.
Unoccupy Workspace removes the window from the current workspace.
The control panel offers four workspaces named 1, 2, 3, and 4.
If you want to take advantage of the "virtual displays" offered
by workspaces you will probably want to make the workspace names more
meaningful. To do this, edit your .Xdefaults file as follows:
.Xdefaults file, refer to Customizing Colors, Fonts and Other Application Defaults.
Vuerx to your
.Xdefaults file, type:
cat basepath/lib/app-defaults/Vuerx >>.Xdefaults
Vuerx*workspaceList: 1 2 3 4
and change the workspace names (1, 2, 3, and 4) to the names that you want. You will see the changes the next time you log in.
For example:
Vuerx*workspaceList: HP Sun Schedules Games
creates four workspaces called HP, Sun, Schedules, and Games as shown in the
following figure.
You can add two more workspaces just by specifying two additional
names in the workspaceList line.

Modified &wwm; Control Panel
ENWARE VUE/RX uses approximately 32 different colors.
To help you customize these colors, 28 complete color palettes are provided.
To change from one palette to another,
edit your .Xdefaults file as follows:
.Xdefaults file, refer to Customizing Colors, Fonts and Other Application Defaults.
Vuerx to your
.Xdefaults file, open $HOME/.Xdefaults and append to it
basepath/lib/app-defaults/Vuerx
*colorPalette: Broica.vpand change the color palette name as desired. The color palettes you can choose are listed in
app-defaults/Vuerx as palette.vp.
(For example, you can choose Ashley.vp or Orchid.vp.)
xrdb -merge .Xdefaults
/usr/vue/bin/vuestyle.
Change the *colorPalette: line to read:
*colorPalette: Dalla.vp
The resulting color scheme is similar to Broica, but the control panel is more blue in color. Try other palettes as well; some of the color schemes are more vibrant than Broica and Dalla.
For the best grayscale display,
change the *colorPalette: line to read:
*colorPalette: GrayScale.vp
For the best monochrome display,
change the *colorPalette: line to read:
*colorPalette: BlackWhite.vp
The default tool box contains :
$HOME/.vuerxrc file.
BOX LiteToolsSubpanel
and define a new control by adding the line:
CONTROL litetool5
CONTROL litetool4 section, add lines
similar to the following:
CONTROL litetool5
{
  TYPE             button
  IMAGE            tools
  LABEL            "FrameMaker"
  PUSH_ACTION      f.exec "/usr/frame/bin/maker"
  PUSH_RECALL      True
  CLIENT_NAME      FrameMaker
}
When you restart ENWARE VUE/RX, your tool box slide-up will be similar to this:
Modified Tool Box
/fonts/vt340
xsmall, small, large, or
xlarge.
If the terminal emulator fails to appear, the problem could be that:
You could install the local client peer programs on every host running an X
session manager, but a simpler solution is to edit your $HOME/.vuerxrc file
as follows:
.vuerxrc that contains the line:
PUSH_ACTION f.exec \
/usr/bin/X11/700X/hpxt.xterm
This line directs ENWARE VUE/RX to download a local xterm from the current X session manager.
PUSH_ACTION f.exec \
/nfs/hp720/usr/bin/X11/700X/hpxt.xterm
For HP-UX 10.x systems:
/nfs/hp720/opt/hpxt/enware/bin/hpxt.xterm
If your system uses XDM, the control panel clock defaults to Greenwich Mean Time. If you don't live in the Greenwich time zone, you'll need to set your clock by following these steps:
env
TZ).
.xsession file, look for the section
where environment variables are set.
set -a line exists,
add the line that sets your timezone after the set -a line.
For example:
set -a                        # turn on auto export


TZ=EST5EDT
To invoke CDE Lite:
/usr/vue/config/Xconfig file.
For HP-UX 10.x systems, edit the /etc/dt/config/Xconfig file.
Vuelogin*xdmMode to True.
sys.xsession file to $HOME/.xsession
A sample sys.xsession file is located in:
/usr/lib/X11/xdm
/opt/hpxt/enware/xdm
/usr/enware/usr/lib/X11/xdm
/usr/lib/X11/xdm
/u/enware/usr/lib/X11/700X/examples
.xsession file.
WM="$XTBINDIR/hpxt.dtwmlite"
The CDE Lite panel appears, similar to the following:

CDE Lite Control Panel
The default control panel contains:
For further information, review the following sections:
man hpxt.dtwmlite
man hpxt.dtfpfile
man hpxt.dtdtfile
The man pages describe in detail the many different customization options available, including:
$HOME/.dt
in your home directory.
A terminal emulator is a window that emulates a complete display terminal. Some common terminal emulators are hpterm, vt320 and xterm. The ENWARE X station software contains versions of these terminal emulators that run on the X station instead of the host.
There are several ways you can start a local terminal emulator:
[Preferences] configuration screen
modules.ld file
and any local terminal emulators listed there become available
from the [Preferences] configuration screen.
To start a local terminal emulator from the [Preferences] screen,
follow these steps:
[F12] to access the configuration screens.
[Preferences] to display the Preferences screen.
[Execute].
[OK].
The terminal emulator appears on your screen.
modules.ld file
and automatically adds any local clients to its root menu.
To start a local terminal emulator from a local window manager:
[Local Clients] entry, then move
the cursor out of the right side of that entry. A sub-menu appears.
$HOME/.mwmrc).
The resource field entry will be similar to the following:
"Local HPterm" f.exec "remsh terminalname hpterm &"
(The hpterm accepts the /dev options documented
in the modules.ld file.
For example:
hpterm -dev /dev/serial
/usr/bin/X11/700X/hpxt.xterm
For HP-UX 10.x systems, type:
/opt/hpxt/enware/bin/hpxt.xterm
To specify a particular type of operation for a local terminal emulator
(either telnet, serial1, serial2, or log operation),
use a -dev /dev/ option.
For example, if you want to specify a second serial port, use
-dev /dev/serial2. The default operation for a local terminal emulator is:
-dev /dev/rlogin.
Other examples include:
/usr/bin/X11/700X/hpxt.xterm -dev /dev/log
/usr/bin/X11/700X/hpxt.xterm -dev /dev/rlogin
/usr/bin/X11/700X/hpxt.xterm -dev /dev/telnet
/usr/bin/X11/700X/hpxt.xterm -dev /dev/serial
The modules.ld file lists the local clients available on your
file server.
When you power on the X station, it reads modules.ld and lists the local
clients on the [Preferences] configuration screen.
When you start a local window manager, the local window manager also
reads modules.ld and lists the local clients in the root menu.
To control which local terminal emulators are available, you need
to edit the modules.ld file.
The modules.ld file (basepath/bin/modules.ld) contains instructions that
show you how to make available local clients that can:
-e command [argument] (execute a command)
-S (slave mode)
-C (console messages).
-dev /dev/telnet[/hostname])
-dev /dev/serial, or -dev /dev/serial2 if you
have a second serial port.)
-dev /dev/log).
For more information, refer to the man page for your local window manager.
For example, type:
man hpxt.hpterm or man hpxt.xterm
TERM=xterm.
[Server] configuration screen's [Login Host] field has an
option called [Local Command].
By using Local Command,
you can start local clients automatically at startup without
using an X session manager.
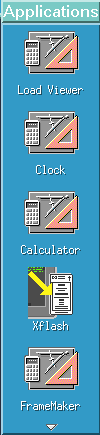
With Login Host set to Local Command, type in the Login Host field the names of the local clients you want to start, separated by semicolons. For a complete list of the clients that are available, see the modules.ld file. Note that the following aliases are defined:
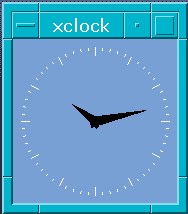
Local xclock is a version of xclock that runs on the X station. You can run the clock in digital or analog form:
To start local xclock from a terminal emulator window, start its peer process
by typing:
/usr/bin/X11/700X/hpxt.xclock
For HP-UX 10.x systems:
/opt/hpxt/enware/bin/hpxt.xclock
man hpxt.xclock
To start local clock from a terminal emulator window, type the full path name:
/usr/bin/X11/700X/hpxt.clock
man hpxt.clock
Local xlock is a version of xlock that runs on the X station. You can use xlock to:
To start local xlock from a terminal emulator window,
start up its peer process by typing:
/usr/bin/X11/700X/hpxt.xlock
For HP-UX 10.x systems:
/opt/hpxt/enware/bin/hpxt.xlock
The following icon appears on your screen:
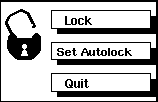
Set Autolock button.
To change the time limit, you can use the -autolock option,
as described below.
You can add several options to the above command line, including the following:
-password password-autolock secondsSet Autolock button on the xlock screen icon.
-autologout seconds-nowindow -mode pattern For a description of these modes, see the man page.
hpxt.xlock -mode message -message "Gone For Lunch"
hpxt.xlock -autolock 900
hpxt.xlock -autologout 900
man hpxt.xlock
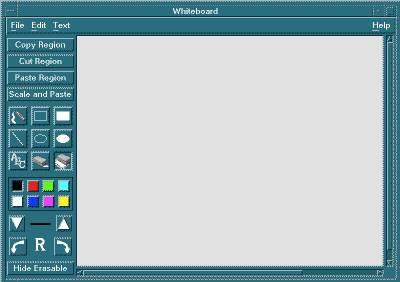
You can use local WhiteBoard to:
There are three ways to start WhiteBoard:
hpxt.whiteboard
man hpxt.whiteboard
[Yes] or [No] for each application.
As the sender, you can:
During a SharedX session, you can also choose to use a shared pointing device, called a "telepointer", which can be manipulated by both the sender and all receivers. SharedX also includes a sample address book, font aliases and user preferences.
Before you start SharedX as a local client, make sure you disable the Client Authorize and Access Control parameters from the configuration screens.
There are two ways to start SharedX:
hpxt.SharedX
man hpxt.SharedX
[Yes] or [No] for each application.