![[Previous]](prev.gif)
![[Next]](next.gif)
![[Contents]](toc.gif)
![[Index]](index.gif)
This chapter describes how to use the various accessories that you can add to your base unit. Topics include:
You can also install one of the network accessory cards to connect your ENVIZEX X station to various types of networks, including:
If you have not yet installed your accessories, you can find installation instructions in the box for each accessory kit.
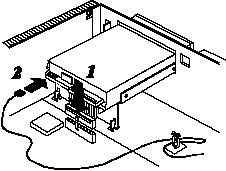
If you have an HP ENVIZEX station, you can install a floppy drive that allows you to transfer files between DOS and UNIX. The floppy system currently supports DOS versions up to and including DOS 6.0.
Topics in this section include:
To format a high-density (1.44 MB) disk, type:
remsh terminal_name format -h
(On Sun systems, use rsh instead of remsh.)
To format a low-density (720 K) disk, type:
remsh terminal_name format -l
Refer to
the man page for hpxt.format for more information.
[F12] to access the configuration screens.
[Utilities].
[Format Floppy].
When you log into a computer that has the HP ENVIZEX software installed,
the floppy drive is automatically mounted and accessible as $HOME/floppy
(or if you prefer, $HOME/a:).
You can proceed to read from and write to the floppy drive as if it were a directory on your UNIX system, with one exception: if you are working within an application program, you must save the file to the UNIX filesystem before you copy it to the floppy.
For example, to save a file from a spreadsheet program, the user Smith
first needs to save the file to the UNIX filesystem.
To write the file data.tmp to the floppy drive, Smith types:
cp data.tmp $HOME/floppy/data.tmp
or
cp data.tmp ~/a:
The floppy's DOS-based file system does not support UNIX hard links. If your application tries to perform a hard link operation on the floppy drive, you will see an error message.
When you transfer files back and forth between DOS and UNIX, select file names that suit DOS naming conventions. With DOS, a file name can be eight characters with a three-character extension (for example, acctdata.wrk) If your file name is too long, the system uses the last eight characters of the name and the first three characters of the extension.
If you use a session mount, which is the default, you need only to log out from your X session before you switch off the X station.
If instead you use the optional mounting methods described in Changing How the Floppy Drive Is Mounted, you need to unmount the floppy before switching off the HP ENVIZEX. Failure to do so may result in "hung" mounts until the floppy is remounted.
[F12] to access the configuration screens.
[Utilities].
A Format Floppy option should appear.
If this option does not appear, the floppy has probably not been
installed correctly. Follow these steps:
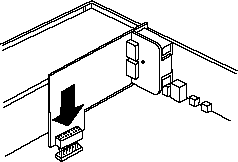
The following diagram illustrates both connections:
To confirm that the X station loaded the Floppy module:
[F12] to access the configuration screens.
[Diagnostics].
[Installed Configuration].
Under Other Peripheral Devices, you should see:
Floppy Drive installed
Under Downloadable Extensions, you should see:
NFSServer
DOSServer
If these lines do not appear, you or your system administrator needs to reinstall the HP ENVIZEX HPXT-FLOPPY fileset.
When you log into a computer that has the ENWARE software installed,
lines added to Xstartup and Xreset
by the ENWARE installation scripts automatically
NFS-mount the floppy drive and create a symbolic link to $HOME/floppy.
If you are using CDE, use the instructions in
Using an Automount Daemon as an example.
With this mount and symbolic link in place, you can use the floppy drive as if it were a directory on your UNIX system.
To change the way NFS mounts the drive, refer to the following sections:
In a default environment, the X station floppy drive is automatically NFS-mounted when you log in through XDM, dtlogin, or vuelogin. If you want to change this behavior, you can set an option so that:
/examples/hpxt_floppy to your
home directory.
$HOME/.hpxt_floppy. The next time you log in, the
floppy mount behavior will be changed accordingly.
By default, the HP ENVIZEX uses session mounts set up in:
/Xstartup, and
/Xreset
where path is:
/usr/lib/X11/xdm /usr/vue/config /opt/hpxt/enware/xdm /etc/vue/config These files mount the floppy drive and create a symbolic link to
$HOME/floppy
when users log in and unmount the drive when users log out.
For example, if you use an application that runs on a server other than your login server, you can use an automount daemon to enable that host to access your floppy drive.
Once you have set up the automount daemons, whenever you access one of these servers, the daemon:
$HOME/floppy.
To set up an automount daemon, perform the following steps on each computer you access:
Xstartup and Xreset that
mount and unmount the floppy.
/etc/auto.hpxtfd
and put the following line in it:
* -soft,timeo=50 &:/hpxtfd
/etc/netnfsrc2
and find the two occurrences of the line that starts the automounter.
By default, it is:
/usr/etc/automount
/usr/etc/automount /nfs -hosts
/hpxtfd /etc/auto.hpxtfd
/usr/etc/automount /hpxtfd /etc/auto.hpxtfd /nfs -hosts
/etc/rc.config.d/nfsconf
and set variables to reasonable values such as:
AUTOMOUNT=1
AUTO_MASTER="/etc/auto_master"
AUTO_OPTIONS="-f $AUTO_MASTER"
/etc/auto_master
and add a line like:
/hpxtfd /etc/auto.hpxtfd
/etc/rc.local
and add the following line:
automount -f /etc/auto.hpxtfd
/floppy directory and the
automounter's mount point. Type:
ln -s /hpxtfd/terminalname $HOME/floppy
If you have superuser privileges, you can mount and unmount the floppy as required:
Xstartup and Xreset that
mount and unmount the floppy.
/etc/mount terminalname:/hpxtfd /users/username/floppy -o soft,timeo=50
/sbin/mount terminalname:/hpxtfd /users/username/floppy -o soft,timeo=50
/etc/umount /users/username/floppy
/sbin/umount /users/username/floppy
/usr/bin/X11/700X/admin/mountfloppy.
When you log in from an HP ENVIZEX that has a floppy drive,
a line in the Xstartup file automatically NFS-mounts your floppy drive.
To enable other HP ENVIZEX station users to log into the same account
and access their floppy drives, modify Xstartup as follows:
$HOME/floppy
Xstartup file:
/usr/lib/X11/xdm/Xstartup
On HP-UX 10.x systems, this file is: /opt/hpxt/enware/xdm/Xstartup
/usr/vue/config/Xstartup
On HP-UX 10.x systems, this file is: /etc/vue/config/Xstartup
.../mountfloppy $DISPLAY $USER $HOME/floppyand add
/$DISPLAY to the end.
Xreset file.
.../unmountfloppy $DISPLAY $USER $HOME/floppy
and add /$DISPLAY to the end.
At log in, users can access their floppy drive as $HOME/floppy/$DISPLAY
For example, the user of the X station
called xterm12 accesses the floppy drive as:
$HOME/floppy/xterm12
If you use an HP version of XDM (including dtlogin or vuelogin), the floppy drive is mounted automatically. If you choose to use your own version of XDM (or if you have an SCO system running scologin), you will need to modify some files so that the floppy can be mounted automatically.
For an example of how to mount and unmount the floppy drive automatically, refer to the following files:
/usr/lib/X11/xdm/Xstartup
/usr/lib/X11/xdm/Xreset
For HP-UX 10.x systems, refer to the following files:
/opt/hpxt/enware/xdm/Xstartup
/opt/hpxt/enware/xdm/Xreset
You can make similar modifications to your own XDM files. These files
will normally be found in /usr/lib/X11/xdm with filenames Xstartup and
Xreset. Under some versions of AIX, these files have been renamed
to GiveConsole and TakeConsole.
You can make these modifications to your own XDM files. These files
are normally found in /usr/lib/X11/scologin with filenames Xstartup
and Xreset.
With the HP ENVIZEX and HP ENTRIA audio accessory kits, you can build or use multi-media applications that incorporate audio components.
Topics in this section include:
You can use the X station audio kit with any application that has been compiled with the HP audio libraries.
However, if you wish to use the full suite of audio tools, you require access to an HP audio server running on an HP 9000 Series 700 or Series 800 workstation. The host must be running HP-UX 9.03 (or greater) or HP MPower 1.2 (or greater).
The following audio specifications apply to both ENVIZEX X stations and ENTRIA X terminals with audio capabilities.
Before you begin:
For example, on the ENVIZEX `p' series, connect the audio jacks as follows:
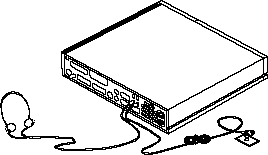
If you have external speakers, ensure they are plugged into the line out connector. Note that external speakers must be amplified.
At power up, HP ENVIZEX and HP ENTRIA X stations automatically detect
that you have installed
an audio card and configure the X station accordingly.
The audio data goes to the device specified by the DISPLAY environment
variable or to the device specified by the AUDIO environment
variable. If the audio server cannot find these values,
the audio data goes to the workstation, not the X station.
If your audio plays on the host instead of your X station, you need to set
your AUDIO environment variable as described in Directing the Audio Data to the X Station.
If your audio plays on the X station but you need to change
where it plays (the internal speaker or your headphones),
refer to Directing the Audio Data within the X Station.
If your audio plays on the host instead of your X station, you need to set
your AUDIO environment variable.
To do this, put the following line in your
$HOME/.xsession file or, for HP VUE users, in your
$HOME/.vueprofile file:
AUDIO=terminalname:0
export AUDIO
setenv AUDIO terminalname:0
You may need to control whether your audio plays to the internal speaker
or to your headphones. You can do this by setting the SPEAKER
environment variable or, for the Audio Editor, by using the audio control
panel, as follows:
To set the SPEAKER environment variable, put the following lines in your
$HOME/.xsession file or, for HP VUE users, in your
$HOME/.vueprofile file:
SPEAKER=EXTERNAL
export SPEAKER
setenv SPEAKER external
SPEAKER=INTERNAL
export SPEAKER
setenv SPEAKER internal
To access the audio editor's control panel, type the following from a
terminal emulator window:
/usr/audio/bin/AudioCP &
For HP-UX 10.x systems, type: /opt/audio/bin/AudioCP &
You control where the audio goes by selecting the "Output" pulldown, then choosing "Speaker" and/or "Headphones."
To load a sample audio file:
/usr/audio/bin/audio_editor or
/opt/audio/bin/audio_editor)
/usr/audio/sounds (/opt/audio/sounds
for HP-UX 10.x). To choose one
of these samples, do the following:
/usr/audio/sounds/*
or /opt/audio/sounds/*
[Filter].
[OK].
To play the sample file, click on [Play]. You can control the volume of
the sound by using the audio editor's control panel.
To confirm that the audio card was installed correctly and its software loaded, follow these steps:
[F12] to access the configuration screens.
[Diagnostics].
[Installed Configuration].
You should see a display similar to the following:
   Other Peripheral Devices
    Audio Board installed.
   Downloadable Extensions
/usr/lib/X11/700X/bin/Aserver
If you do not see any references to the audio board, check that it was installed correctly:
If the audio board is installed correctly, but you do not see the Aserver extension, the system administrator needs to install the HPXT-AUDIO fileset.
With the optional ENWARE MPEG accelerator card (HP Part Number C5208A), you can view full-motion digital video movies with synchronized CD-quality sound (with the optional audio accessory kit). By using the ENWARE Video Player local client, you can play and manipulate MPEG movies directly on the X station without significantly loading the network or the host.
Topics in this section include:
You can access the ENWARE Video Player either as a standard local client or through MPower. Before you can access it through MPower, you must configure MPower as follows:
To use the MPEG accelerator card,
you must run the ENWARE Video Player from the X terminal.
If you are currently running the Video Player from the host,
select [Yes].
There are three ways to play a video:
hpxt.Video_Play [-f filename]
for example:
hpxt.Video_Play -f /usr/lib/X11/700X/examples/video/sample.mpg
For a complete list of the command line options, type:
man hpxt.Video_Play
When you start the Video Player, the following window appears:
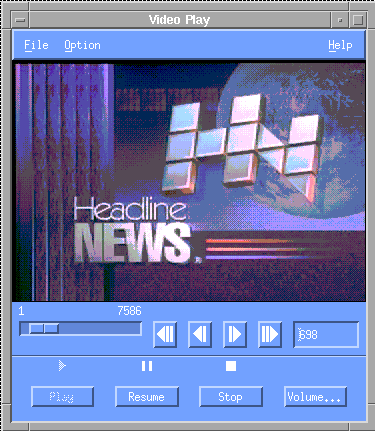
Video Play Window
The Video Play window has the following elements (from top to bottom):
[Play] starts playing the video (and audio if present)
from the currently displayed frame to the end.
[Pause] suspends the video and audio at the next available frame.
Select this button again to [Resume] the video.
[Stop] stops playing the video and rewinds the file to the beginning.
[Volume] lets you control the audio output
(if the video contains an audio track and an audio card is installed).
The File pulldown contains the following options:
The Options pulldown contains the following options:
[Play] button.)
The following General Setup options are available:
With a private color map, the video player uses a palette of 256 colors for the video. This may cause other windows to change color whenever the Video Player window has the input focus.
To avoid color changes whenever the input focus changes, you can use a shared color map. In this case, the Video Player uses a palette of 128 colors. If 128 colors are not available, it issues a warning message and uses 64. To get the full 128 colors, you may need to exit other applications.
The frame rate does not affect the audio and video synchronization. It also does not affect the amount of data transferred into the X station through the network.
With the SCSI/ROM accessory kit, you can attach an HP ScanJet IIc or IIcx scanner to your HP ENVIZEX station.
Topics in this section include:
To use the scanner, you require an HP 9000 Series 700/800 workstation that is running DeskScan/UX. (You must purchase DeskScan/UX separately and install the scan license to run the scanner in the HP MPower environment.)
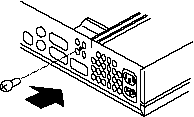
Before you power on your X station, ensure that the scanner cable is connected securely to the SCSI port at the back of the chassis.
To start the scanner software:
/usr/scan/deskscan &
/opt/scan/deskscan &
You can use a scanner that is connected to your host computer or one
that is connected to your X station.
The X station automatically detects a local scanner. If you want to use
another scanner, you need to change the SCANNER environment variable
by putting the following lines in your $HOME/.vueprofile, .xsession,
or .profile file:
SCANNER=terminalname
export SCANNER
setenv SCANNER terminalname
.vueprofile file.
To confirm that the scanner card was installed correctly, follow these steps:
[F12] to access the configuration screens.
[Diagnostics].
[Installed Configuration].
You should see a display similar to the following:
                      SCSI Devices
Vendor ID: HP  --  Product ID: C1750A   --  Revision 3226
                  Downloadable Extensions
             /usr/lib/X11/700X/bin/ScanServer
By installing a ROM server in your HP X station, you can:
xflash local client.
You can use a ROM card with all types of HP X stations:
To install a ROM card into an X station:

Once you have set up your X station in the host files (by using
xtadm or equivalent), you need to configure your X station to use the
ROM card.
To configure the X station to boot from its ROM card the next time it is switched on:
[F12] to access the configuration screens.
[Server].
[ROM Fonts].
(If the ROM card is not properly installed, you will see a
warning popup window. If you see this warning, check the installation of
the ROM adaptor board and the ROM card.)
X Server from [ROM] and RGB file from [ROM].
[Network], then click on [Ethernet],
[Token Ring], [100VG], [SLIP1], [SLIP2],
[PPP1], or [PPP2] as appropriate.
IP Address field and enter your IP address.
File Server field and enter the IP address
of a computer on which you will be running applications.
Subnet Mask and enter a suitable subnet mask if the default
is not appropriate.
[OK].
This section explains how you can use the local client xflash to reprogram a flash ROM card. Topics in this section include:
xflash.
If you are running other local clients, the incremental memory will be
considerably less.
For example, if you are running ENWARE VUE/RX, you need only 1.5 MB of
additional memory to run xflash.
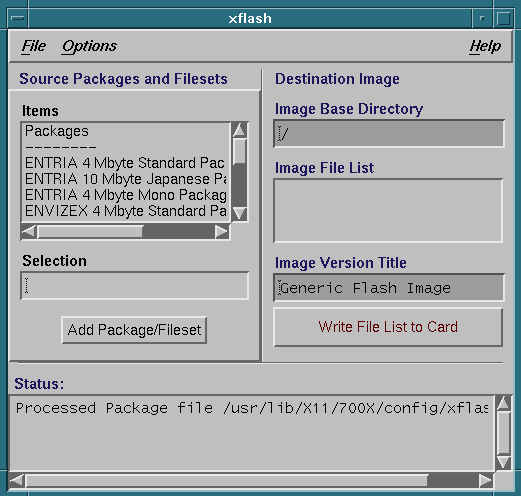
xflash Main Screen
To start xflash from a command line in a terminal emulator window, type:
/usr/bin/X11/700X/hpxt.xflash &
For HP-UX 10.x systems, type:
/opt/hpxt/enware/bin/hpxt.xflash &
To start xflash from mwm or local mwm, you may need to
add the following line to your .mwmrc file, under the
"Root Menu Description":
xflash f.exec /usr/bin/X11/700X/hpxt.xflash &
For HP-UX 10.x, add:
xflash f.exec /opt/hpxt/enware/bin/hpxt.xflash &
When you restart mwm, xflash will be available on your root menu.
To start xflash from ENWARE VUE/RX click on the xflash icon on the "tool box" slide-up.
To start xflash from HP VUE 3.0:
To program a ROM card, you need to create an image, a set of files that can boot and run an X station. When you choose files to include on the ROM card, you need to ensure that you have included all the files the X station requires to boot and that the files you have chosen fit on the ROM card.
To create an image with the 7.0 version of the X server, do the following:
[Add Package/Fileset].
The contents of the package appear in the
"Image File List" window.
[Write File List To Card]. xflash automatically
erases and reprograms the ROM card. The time
required for erasing and reprogramming depends
upon the type of ROM card:
You can customize your image file by adding additional files such as font files. To add new files:
[Custom File Chooser].
[Add File]. The file appears
in the "Image File List" on the main menu.
[File] and choose
[Write List To Image File]. Use this menu to
write the image to a temporary location and
watch the main menu's "Status" window to
determine the image file size. If the image
file will fit on the ROM card:
[File].
[Write Image File To Card].
xflash reprograms the ROM card.
Warning: File xxxx already exists. File not added.
[Replace Duplicate Files]. This
causes xflash to overwrite any existing files with the
corresponding new file.
If you want to make significant changes to the File List, you can use a text editor to edit xflash.pkg, the file that generates the File List. To customize the xflash.pkg file, follow these steps:
/config/xflash.pkg to $HOME/xflash.pkg
$HOME/xflash.pkg by following the instructions contained within.
From the [File] pulldown, you have the following options:
[Read Image File From Card] enables you to read
the image file currently on your ROM card and
store it as an image file on the host computer.
By doing this, you can temporarily use the ROM
card to store other data. (See below).
[Read Raw Data From Card] and [Write Raw Data
To Card] options enable you to store any type of
data on the ROM card. These options bypass the xflash
data compression routines that are automatically
applied to image files.
From the [Options] pulldown, you have the following options:
[Generate fonts.dir] and [Generate modules.ld] options control whether
or not xflash automatically generates fonts.dir and modules.ld files.
Disable these options if you want to provide your own version of these files.
[List Filesets] option controls whether or not xflash displays the
filesets that are in packages.
For more information about xflash, refer to the man page. Type:
man hpxt.xflash
When you switch on an X station it downloads its base system, X server file, rgb.txt file, and fonts from a file server. In most cases, the X station receives these files from a host computer (the file server) or from a ROM-based server card installed in the X station. However, you can also set up an HP X station with a ROM-based server card to boot any number of similar X stations. In this case, the X station with the ROM card functions as the file server.
[F12] to access the configuration screens.
[Server] configuration screen.
[Extensions].
[OK]
[OK]
[F12] to access the configuration screens.
[Network] configuration screen.
[File Server] field and enter the IP address of the other
X station (the one with the ROM card installed).
[NFS].
[Server] configuration screen.
[X Server file] field, enter the following:
C27XXA
C32XXA.
[Base path] field is set to:
/usr/lib/X11/700X.
For HP-UX 10.x systems, the base path is: /opt/hpxt/enware/xthome.
[OK]
[Start] to initiate the download.