![[Previous]](prev.gif)
![[Next]](next.gif)
![[Contents]](toc.gif)
![[Index]](index.gif)
This section includes the following topics:
If a "Boot Failed" error message appears, identify the specific problem by following the steps outlined in the following sections:
Accompanying the above bootup error message are other error messages. Look them up in Messages and take the action suggested there.
If you cannot solve the problem in Messages, verify that the network and essential host programs are operating normally by downloading the server using the simplest configuration.
In its simplest configuration the X station depends only on the TFTP software running on the host software.
To use the simplest configuration, connect the X station to the computer without an intervening gateway.
[General Network] configuration screen,
click on [Factory Defaults],
then set Network Parameters to [from Fields Below].
[Ethernet Network] configuration screen,
set IP Address to the X station's IP address and
File Server to the computer with the X station's base system file.
If the X station does not boot when using its simplest configuration, run the built-in selftests:
[Setup] icon,
[To Config], or
[Diagnostics], then [Selftests].
Once it is given an IP address, the X station can respond to a ping.
[F12] to access the configuration screens.
[Network], then click on [Ethernet].
[OK].
/etc/ping Xstation_ip_address
/etc/ping 75.4.11.128
/usr/sbin/ping Xstation_ip_address).
If the X station is correctly connected to the LAN, it echoes packets.
If the network is working, but the server code still does not download, check the operation of TFTP as follows;
Installation testing from the main menu.
Check software installation from the installation testing menu.
If TFTP passes, try increasing the File Timeout setting
on the [General Network] configuration screen.
If TFTP and NFS fail but the LAN is working, configuration files may not be set up properly on the file server or the X station software may not be installed correctly:
inetd security file at
/usr/adm/inetd.sec, ensure that you included the
IP address of your X station.
/etc/hosts table (with more than 200 entries),
be sure that your X station is entered near the top of the table.
This section helps you solve some problems you may encounter with BOOTP. See:
Using BOOTP to transfer parameters through a gateway
may work, but it is not
supported; the boot server should be on your immediate network subnet.
If you cannot use BOOTP,
on the [General Network] configuration screen
set the configuration to
"Network Parameters [from Fields Below]" and
on the Ethernet Network screen type in the network values.
If an error is present in an entry, all entries below the erroneous
entry are inaccessible. These errors are best diagnosed by turning on
inetd loggin. Refer to the man page for inetd for details.
xtadm)
to create bootptab
entries instead of editing the file directly.
For more information about editing bootptab manually, refer to the
following sections:
The BOOTP packet is divided into a standard portion and a vendor
information portion.
The tags that supply vendor information are
terminalname.domain, ds, gw, sm, T144, and T145.
T144 and T145 are specific to the X station:
"xterm1.cfg".
"75.6.8.3 75.6.8.5".
Leave this tag out if the file server is the same as the boot server.
The total size of the vendor information portion of a BOOTP packet cannot be larger than 64 bytes. Hence, it is important to minimize the length of all strings. It may also be advisable to omit the inclusion of an alternative name server unless it is deemed necessary.
The size of the vendor information portion of a BOOTP packet can be calculated as follows:
ds = 2 bytes + 4 bytes/name server
gw = 2 bytes + 4 bytes for the gateway
sm = 6 bytes
T144 = 2 bytes + string (excluding quotation marks)
T145 = 2 bytes + string (excluding quotation marks)
If there is not enough room for your information in the vendor information portion of the BOOTP packet, you can still download the information by using a remote configuration file. If you installed your X stations by using the administration script, it created the remote configuration files automatically and you need only to edit them. For details on using remote configuration, refer to Configuration Options.
If the X station boots using TFTP but not using NFS, NFS probably has not been set up properly:
/etc/exports
and
/etc/hosts.
/etc/exports file (Note: on Solaris 1.x systems, this is
/etc/hosts. On Solaris 2.x systems this is:
/etc/dfs/dfstab)
/opt/hpxt/enware/xthome
ps -ef | grep nfsd
ps -ef | grep mountd
other
and that basepath/bin
and your font directories
have read and execute permissions for other.
If NFS works in general except for certain fonts, there must be something
peculiar about these fonts.
Look in /etc/checklist (/etc/fstab for HP-UX 10.x)
and review the partitioning of your
file systems.
If you use the administration script to add an X station while NFS
is installed on your computer, your X station is assigned export permission
for all installed ENWARE font directories.
Additional font directories must be on the same physical drive or
disk partition. If your font directories do not meet this condition,
you need to edit /etc/exports.
If you are able to boot using TFTP but occasionally have problems with NFS, check the number of CRC errors on the Ethernet Statistics screen to see if you have a noisy LAN.
With the addition of the Token Ring adapter card, the ENVIZEX station can boot using either the Token Ring or the Ethernet interface. When configured to use BOOTP, the X station first tries the Token Ring interface. If the attempt fails, the X station then tries to boot from the Ethernet interface.
Topics in this section include:

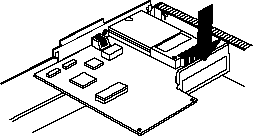
If this icon is not present and you have installed an adapter card, open the chassis and ensure the card is seated properly (push down).
[F12] to access the configuration screens.
[Network] screen.
[Token Ring].
[OK].
The first step towards diagnosing a problem involving the Token Ring
connection is to run the selftests from the [Token Ring] Network screen.
A message line below the selftest button displays state messages
for 60 seconds, or until the selftest passes, whichever comes first.
These messages are also logged to the log screen.
If the selftest passes, the Token Ring adapter card inserts itself into the ring and functions normally. The message sequence for a normal selftest is:
If the selftest detects an error, the two most likely causes are:
If the selftest determines beaconing on the ring (most likely due to a speed difference), the selftest terminates. After you have changed the Token Ring Speed (Default = 16Mbps), remember to reboot the X station to regain the connection to the Token Ring.
If you see these messages, examine both ends of the cable to ensure proper connection. If necessary, replace the cable and run the selftest again.
If the selftest fails for any other reason, contact your Hewlett-Packard support representative.
wire link level address instead of the option link level address
in the bootptab entry.
![]()
If this icon is not present and you have installed an adapter card, open the chassis and ensure the card is seated properly (push down):

If a red "X" appears over the icon, check the cable connection from
the X station to the hub. Click on the [Start] icon to reboot.
When you attach an X station to a 100VG network, there is an initial training period (called "logging in a node") during which the hub becomes aware of the node and includes it in its polling cycle. During this period (up to 12 seconds), no data can be sent or received over the network.
The first step towards diagnosing a problem involving
the 100VG connection is to
run the selftests from the [100VG] Network screen.
A message below the selftest
button displays diagnostic messages.
These messages are also logged to the log screen.
Common messages and suggested actions include:
The cable may be bad or disconnected
The cable has too much noise
[Diagnostics] configuration screens) for all messages.
[100VG Statistics] from the
Diagnositics screen menus. These statistics measure the number of frames
received and transmitted and may indicate errors occurring on the LAN or
possible hardware problems.